3D Printing For Jewellery & Diamond
3D printing is being used in a wide range of fields, including the Jewellery & Diamond couture industry, due to its rapid prototyping technology. Today, 3D printing technology is becoming increasingly sophisticated, making jewellery customisation, which has always been a high profile process, more accessible. At the same time, 3D printing has also solved many of the challenges of making designs that were too complex to be quickly and accurately presented.
The traditional manual inlay technology has high labor costs and rough workmanship. In order to make customized jewelry closer to the delicacy and perfection of big brands, Wonder Tech integrates traditional craftsmanship with modern technology, uses 3D printing technology to help customers design styles, first makes shapes on the computer, debugs them, and prints them out immediately after customers are satisfied. Three-dimensional cere. After that, Wonder Tech introduced a micro-setting instrument that can see even the air and dust clearly, making the inlaid jewelry more delicate and perfect.
This Completes The 3D Printed Piece Of Jewellery & Diamond
3D printing technology makes up for the ‘hard work’ of intricate lines and hollowing that artisans cannot do. All plaster and wax moulds are simply programmed and mechanically operated with a high degree of precision, and even the most complex and varied shapes can be printed out using computer settings. In addition, 3D printed jewellery is certainly more affordable for the general public than the expensive custom-made jewellery.
World-Class Jewellery & Diamond 3D Printing Services
Wonder Tech is dedicated to providing game-changing solutions- high-performance solutions and faster 3D Printing Jewellery & Diamond services with flexible designs.
We have brought nearly 20 years of materials and manufacturing expertise to every layer of your 3D products to help you in unlocking every dimension of 3D printing techniques.
Step1:Designing The Jewellery
At the beginning of the design process, it is important to consider the details of metal type and colour to best match the true colour of the diamond. In most cases, the client will provide their preferred design or a similar sample, and the production team will need to put a lot of effort into researching the design, sketching out the jewellery design and going over it again and again.
Step 2: Scanning The Diamond
The combination of 3D printing technology and traditional craftsmanship provides a guarantee for the production of complex simulation ornaments, bringing surprises and shocks to customers.
3D scanning to create an accurate digital model of the diamond
During the scanning process, in order to maximise the brilliance of the coloured diamond centre, a reflector is usually wrapped around the underlying structure of the jewellery, i.e. the reflector is placed underneath the diamond or stone in a cup-like structure and scanned to see if it matches the diamond’s profile perfectly.
Step 3: Creating The Virtual Model
The design team used the latest Rhino technology to create a virtual model of the jewellery. With the virtual model, the designer can design every aspect of the jewellery accurately, making each sector proportional and ensuring that the final product is more attractive.
At the same time, the designer can obtain accurate information about the jewellery, so that in addition to looking beautiful, it is also more comfortable for the user to wear. In some cases, the design team will suggest changes to the user based on previous experience to ensure that the final product is more comfortable to wear.
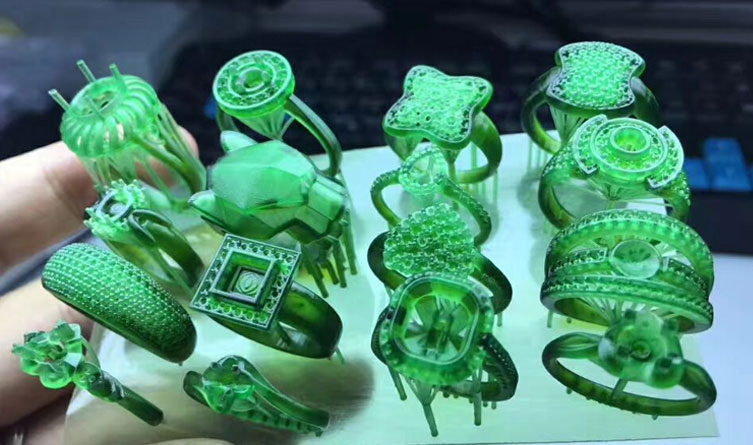
Step 4: 3D Printed Model
The revised digital model is sent to a resin 3D printer for printing, resulting in a high resolution 3D wax model of the diamond ring.
This is a key point for quality control as it is the first sample in the manufacturing process and if the wax copy of the ring does not match accurately, the design team will go back to the drawing board to create another usable design.
Step 5: Casting The Model
Once the model is complete, it is time to start casting the model. The wax model is attached to a casting tree to begin the mould making for each jewellery piece. Of course, the model for each piece of jewellery is created separately, ready for the process that follows. In effect, the process is a multi-cast casting, with each model being manufactured as a separate part.
The casting furnace
The casting supports are placed in the casting furnace for heating
A plaster mould is created around the wax tree, which is vacuumed to remove air bubbles. During the drying of the model, the wax inside burns, leaving a final negative mould for the jewellery, which is then cooled by pouring the melted gold or platinum into the mould.
A ring and its cast model
The final step is to strip the plaster mould from around the gold or white gold and add the various jewellery knots to the tree.
Step 6: Assembling The Jewellery
Cut each part of the jewellery from the casting tree, sort it before assembling it, choose different thicknesses of thumb to polish each section of jewellery and, if necessary, sift through it with a rotary cylinder. Once everything is ready, the pieces can be soldered together to complete the final assembly.
Step 7: Setting The Stones
Once the setting has been completed and pre-polished, the jewellery is ready to be set. Even though the position of the central stone has been predetermined at the design stage, it is not suitable for setting the side stones. To ensure maximum precision and accuracy, the gem-setting technician will drill holes in the side of the ring wall for each of the side stones under a microscope.
Step 8: Polishing And Engraving
Once the diamond has been inserted one by one into the jewellery setting, it is then polished more thoroughly. For a diamond jewellery piece to sparkle enough, the metal of the band itself is also required to be shiny.
Step 9: Jewellery Quality Control
Once the jewellery is complete, the design team continually assesses the quality of the jewellery at each stage of the manufacturing process, a process essential to the perfection of a design, and quality checks are carried out on a continuous basis.
Step 10: Jewellery Quality Assessment
There will be many small details that were not discussed during the manufacturing process. For example, if the main stone is yellow in colour, then embedding it in a 24 carat gold band will maximise the colour characteristics of the stone, but if it is a gorgeous pink diamond, then a rose gold band would be the best choice.